Introduction
Coolify is an excellent self-hosted deployment platform, but like any web-facing service, it needs robust security measures. CrowdSec provides an intelligent, community-driven security solution that can significantly enhance your Coolify setup’s protection against malicious traffic, brute force attacks, and other security threats.
This comprehensive guide will walk you through setting up CrowdSec as a firewall for your Coolify installation, including advanced features like CAPTCHA challenges and Discord notifications.
Why Use CrowdSec with Coolify?
CrowdSec offers several advantages over traditional firewall solutions:
- Community Intelligence: Leverages crowd-sourced threat intelligence from thousands of users
- Behavioral Analysis: Detects attack patterns rather than just blocking known bad IPs
- Flexible Remediation: Supports various response types (ban, captcha, rate limiting)
- Real-time Protection: Integrates seamlessly with Traefik (Coolify’s proxy)
- Low False Positives: Advanced parsing reduces legitimate traffic blocks
Step 1: Installing CrowdSec
First, install CrowdSec on your Coolify host server:
apt update
apt upgrade -y
curl -s https://install.crowdsec.net | sudo bash
apt install crowdsecVerify the installation:
systemctl status crowdsecStep 2: Configure CrowdSec for Coolify
Since Coolify uses port 8080, we need to configure CrowdSec to use a different port:
nano /etc/crowdsec/config.yamlModify the api.server.listen_uri section:
plugin_config:
  user: nobody
  group: nogroup
api:
  client:
    insecure_skip_verify: false
    credentials_path: /etc/crowdsec/local_api_credentials.yaml
  server:
    log_level: info
    listen_uri: 0.0.0.0:8095  # Changed from default 8080
    profiles_path: /etc/crowdsec/profiles.yaml
console_path: /etc/crowdsec/console.yamlImportant: Change 127.0.0.1 to 0.0.0.0 to avoid connection issues between Docker containers and CrowdSec.
Restart CrowdSec:
systemctl restart crowdsecTest the connection from Coolify’s proxy:
docker exec coolify-proxy wget -qO- http://host.docker.internal:8095/v1/heartbeatNote: A 401 Unauthorized response is also OK – it means the connection works but we’re not authenticated yet, which is expected at this stage.
Step 3: Install Firewall Bouncer
In Crowdsec, “bouncers” are responsible for blocking traffic and “collections” for analyzing logs
Install the nftables bouncer for system-level protection:
apt install crowdsec-firewall-bouncer-nftables -yVerify installation:
cscli metricsLook for cs-firewall-bouncer under Local API Bouncers Metrics.
It’s worth to mention that nftables bouncer might have problem with recognizing real IP address if you are using Cloudflare Proxy (traefik-bouncer doesn’t have this problem). So in Cloudflare scenario is worth to replace nftables-bouncer with cloudflare-bouncer
Step 4: Optional CrowdSec Community Integration
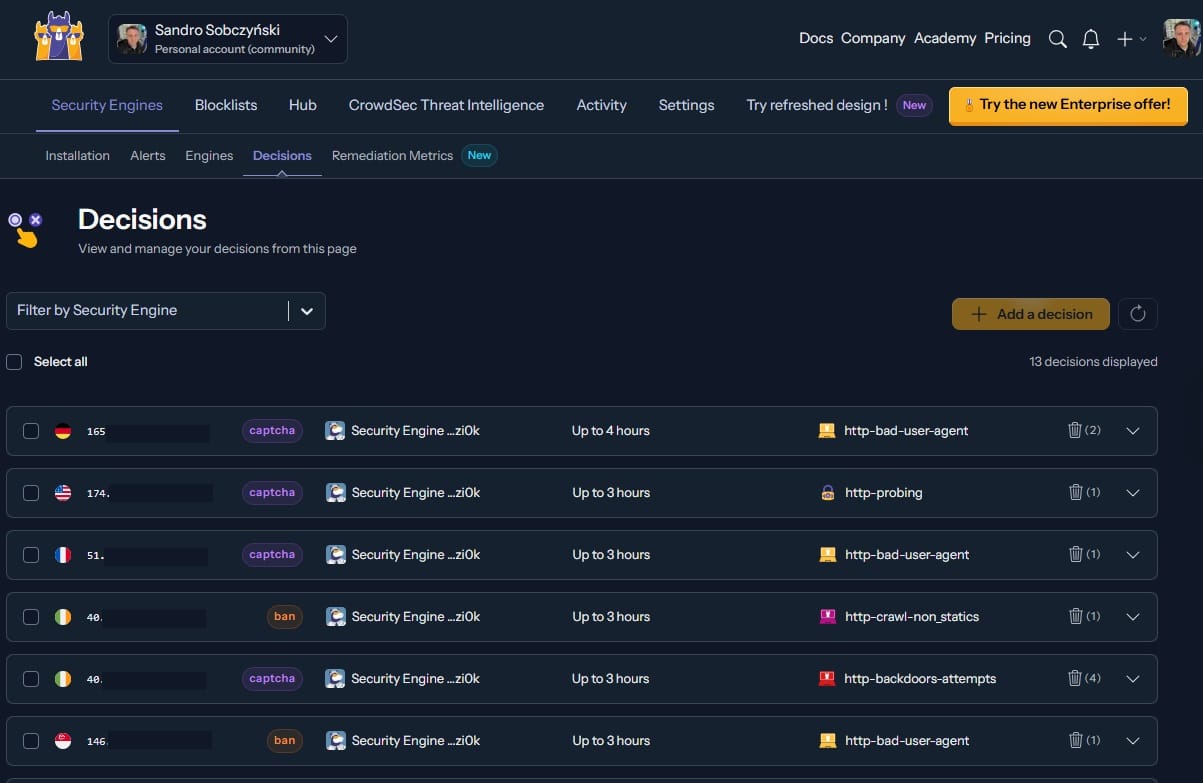
While CrowdSec works perfectly in standalone mode, connecting to the community console provides additional benefits:
- Web-based dashboard
- Community threat intelligence
- Geolocation data
- Shared blocklists
To enroll (optional):
- Sign up at https://app.crowdsec.net/signup
- Copy the enrollment command from your console
- Execute:
cscli console enroll XXXXX - Approve the enrollment in the web console
Step 5: Configure Traefik Integration
Generate a bouncer API key for Traefik:
cscli bouncers add traefik-bouncerSave the generated key – you’ll need it in the next step.
Create the CrowdSec plugin configuration for Traefik:
nano /data/coolify/proxy/dynamic/crowdsec-plugin.yamlhttp:
middlewares:
crowdsec:
plugin:
bouncer:
crowdsecMode: live
crowdsecLapiHost: 'host.docker.internal:8095'
crowdsecLapiKey: 'YOUR_BOUNCER_API_KEY_HERE'
enabled: trueStep 6: Configure Coolify Proxy
Find the latest version of the Traefik bouncer plugin at https://github.com/maxlerebourg/crowdsec-bouncer-traefik-plugin (check releases tab).
Create directory for access logs:
mkdir -p /data/coolify/proxy/accesslogs/Edit the Coolify proxy configuration:
nano /data/coolify/proxy/docker-compose.ymlAdd these command line arguments to the Traefik service:
name: coolify-proxy
networks:
  coolify:
    external: true
services:
  traefik:
    container_name: coolify-proxy
    # ... existing configuration ...
    command:
      # ... existing commands ...
      - '--experimental.plugins.bouncer.modulename=github.com/maxlerebourg/crowdsec-bouncer-traefik-plugin'
      - '--experimental.plugins.bouncer.version=v1.4.2'  # Use latest version
      - '--accesslog=true'
      - '--accesslog.format=json'
      - '--accesslog.bufferingsize=0'
      - '--accesslog.fields.headers.defaultmode=drop'
      - '--accesslog.fields.headers.names.User-Agent=keep'
- '--accesslog.filepath=/traefik/accesslogs/access.log'Note: If you’re using Cloudflare, you might need to add additional labels depending on your setup. The CrowdSec middleware should be compatible with Cloudflare’s proxy.
      - '--entryPoints.http.forwardedHeaders.insecure=true'
- '--entryPoints.https.forwardedHeaders.insecure=true'Important: After editing the docker-compose.yml file, always run:
docker compose up -dNote: If you use IPv6 you NEED to add following section in /etc/docker/daemon.json and restart docker service (sudo systemctl restart docker).
Without this traefik would return you wrong client IP addresses like 10.0.1.1
{
  "ipv6": true,
  "fixed-cidr-v6": "2001:db8:1::/64"
}Debugging Tips
If you encounter issues, check Traefik logs:
docker logs coolify-proxyLook for any errors related to plugin loading or configuration. The logs will help identify if there are issues with the CrowdSec plugin setup or access log configuration.
Step 7: Configure Log Rotation
To prevent access logs from growing too large, set up log rotation:
nano /etc/logrotate.d/traefik/data/coolify/proxy/accesslogs/access.log {
size 10M
rotate 5
missingok
notifempty
extension .log
maxage 14
postrotate
docker kill --signal="USR1" coolify-proxy
endscript
}This configuration:
- Rotates logs when they reach 10MB
- Keeps 5 rotated files
- Deletes logs older than 14 days
- Signals Traefik to reopen log files after rotation
Move logrotate to run hourly instead of daily:
mv /etc/cron.daily/logrotate /etc/cron.hourly/
systemctl restart cronTest the configuration:
logrotate /etc/logrotate.d/traefikStep 8: Enable CrowdSec for Your Applications
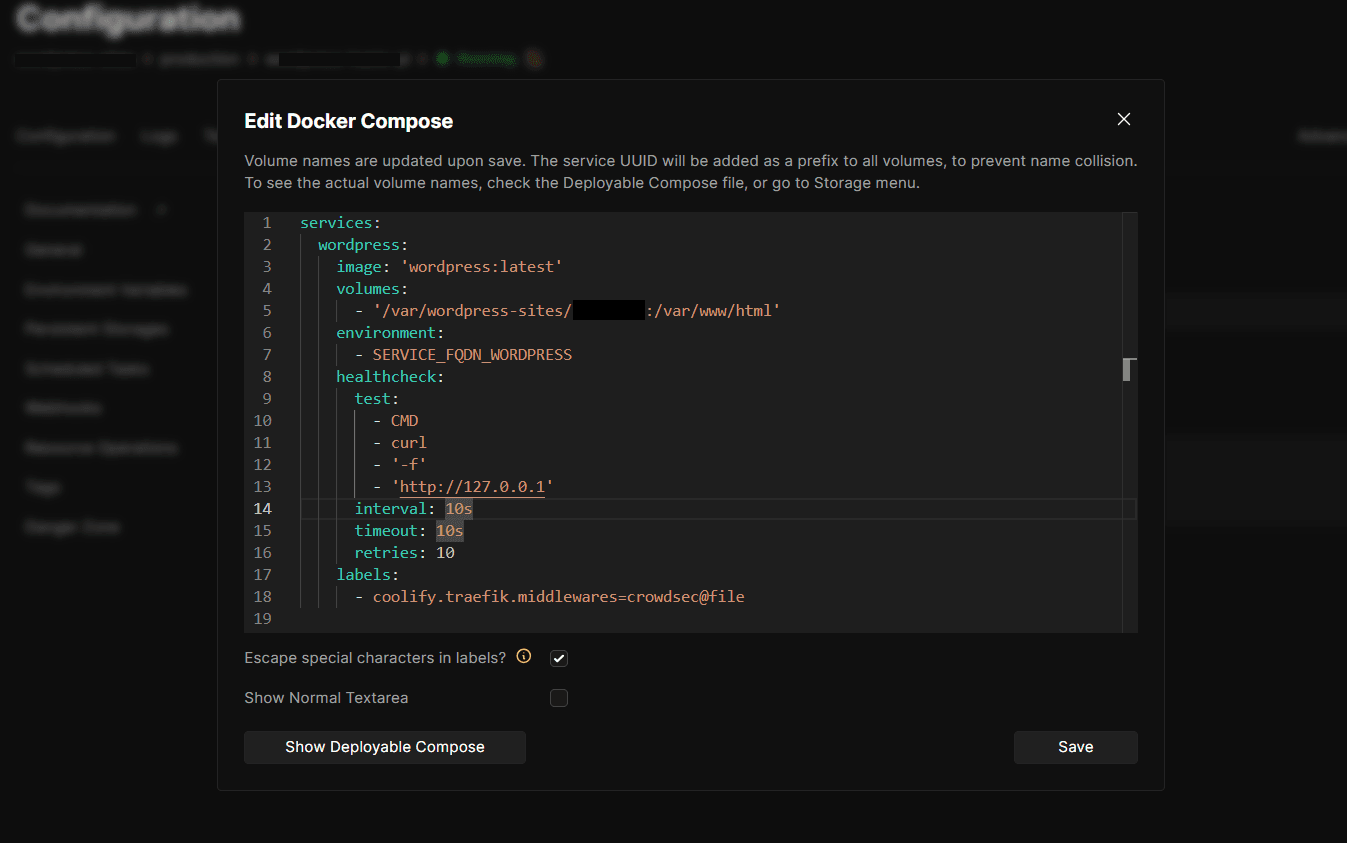
To protect your Coolify applications with CrowdSec:
- Go to your Coolify dashboard
- Open your website/service
- Click “Edit compose file”
- Add the CrowdSec middleware label:
labels:
- coolify.traefik.middlewares=crowdsec@fileRestart Traefik:
cd /data/coolify/proxy
docker compose up -d
docker restart coolify-proxyStep 9: Configure Log Analysis
Install the Traefik collection for log parsing:
cscli collections install crowdsecurity/traefik
systemctl reload crowdsecConfigure CrowdSec to analyze Traefik logs:
nano /etc/crowdsec/acquis.yamlAdd:
---
filenames:
  - /data/coolify/proxy/accesslogs/access.log
labels:
type: traefikRestart both services:
docker restart coolify-proxy
systemctl restart crowdsecStep 10: Testing Your Setup
Test the configuration to ensure everything is working properly.
Check Access Logs
Monitor /data/coolify/proxy/accesslogs/access.log for incoming requests:
tail -f /data/coolify/proxy/accesslogs/access.log | jqTest IP Blocking
⚠️ Important: Use a different device and network (like your phone with mobile data) to avoid accidentally blocking yourself!
From another device, note your IP address by visiting your website, then manually block that IP for testing:
cscli decisions add -i YOUR_TEST_IP -d 10mVerify Protection
Try accessing your site from the blocked IP – it should be denied.
Remove Test Block
Clean up the test by removing the block:
cscli decisions remove -i YOUR_TEST_IPAdvanced Features
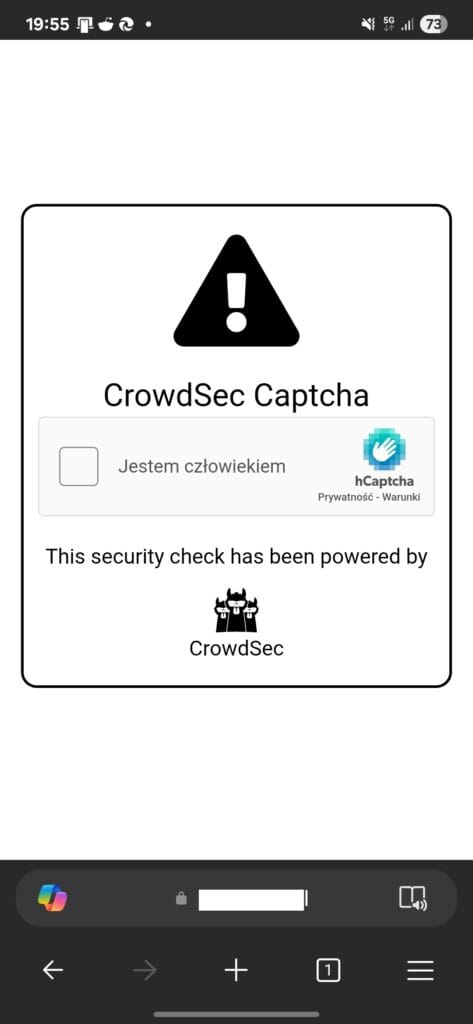
CAPTCHA Integration
For sophisticated attack mitigation, configure CAPTCHA challenges:
Download CAPTCHA template:
wget https://raw.githubusercontent.com/maxlerebourg/crowdsec-bouncer-traefik-plugin/main/captcha.html -O /data/coolify/proxy/dynamic/captcha.htmlSign up for hCaptcha at https://www.hcaptcha.com and get your site key and secret key.
Configure CAPTCHA profile:
nano /etc/crowdsec/profiles.yamlname: captcha_remediation
filters:
- Alert.Remediation == true && Alert.GetScope() == "Ip" && Alert.GetScenario() contains "http" && GetDecisionsSinceCount(Alert.GetValue(), "24h") <= 3
decisions:
- type: captcha
duration: 4h
notifications:
- discord
on_success: break
---Update bouncer configuration:
nano /data/coolify/proxy/dynamic/crowdsec-plugin.yamlhttp:
middlewares:
crowdsec:
plugin:
bouncer:
crowdsecMode: live
crowdsecLapiHost: 'host.docker.internal:8095'
crowdsecLapiKey: 'YOUR_API_KEY_HERE'
enabled: true
captchaProvider: hcaptcha
captchaSiteKey: YOUR_HCAPTCHA_SITE_KEY
captchaSecretKey: YOUR_HCAPTCHA_SECRET_KEY
captchaHTMLFilePath: /traefik/dynamic/captcha.htmlTest CAPTCHA Functionality
⚠️ Important: Use a different device and network (like your phone with mobile data) to test CAPTCHA functionality safely!
Add a CAPTCHA decision for your test IP:
cscli decisions add --ip YOUR_TEST_IP -d 10m -t captchaVisit your website from that IP to see the CAPTCHA challenge in action.
Remove the test CAPTCHA when done:
cscli decisions remove --ip YOUR_TEST_IP -t captchaFree bonus content!
If you want to get my script for automatically patching such a Coolify server for free, sign up for my newsletter!
I wrote this script to make it quick and just one click away. After signing up, you’ll receive a link to the bonus section of my articles.
Thanks!
Discord Notifications
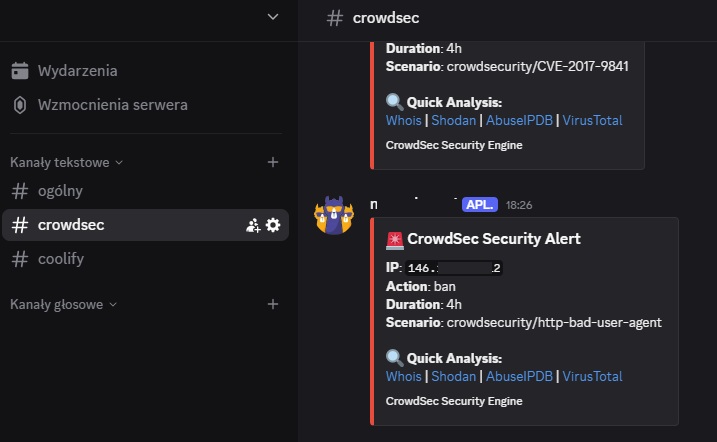
Get instant alerts about security events:
Create the notification configuration file:
nano /etc/crowdsec/notifications/discord.yamltype: http
name: discord
log_level: info
format: |
{
"embeds": [
{
"title": "🚨 CrowdSec Security Alert",
"color": 15158332,
"description": "{{range . -}}{{$alert := . -}}{{range .Decisions -}}**IP**: `{{.Value}}`\n**Action**: {{.Type}}\n**Duration**: {{.Duration}}\n**Scenario**: {{.Scenario}}\n\n🔍 **Quick Analysis:**\n [Whois](https://www.whois.com/whois/{{.Value}}) | [Shodan](https://www.shodan.io/host/{{.Value}}) | [AbuseIPDB](https://www.abuseipdb.com/check/{{.Value}}) | [VirusTotal](https://www.virustotal.com/gui/ip-address/{{.Value}})\n\n{{end -}}{{end -}}",
"footer": {
"text": "CrowdSec Security Engine"
}
}
]
}
url: YOUR_DISCORD_WEBHOOK_URL_HERE
method: POST
headers:
Content-Type: application/json4. Enable Notifications in Profiles
Edit the profiles configuration:
nano /etc/crowdsec/profiles.yamlAdd to the default profile:
name: default_ip_remediation
filters:
 - Alert.Remediation == true && Alert.GetScope() == "Ip"
decisions:
 - type: ban
   duration: 12h
notifications:
 - discord
on_success: breakTest Discord Notifications
Restart CrowdSec and test the notification system:
systemctl restart crowdsec
cscli notifications test discordAllowlist Configuration
Prevent accidental blocking of legitimate traffic. It is very important, because sometimes Crowdsec might ban our server (oops!), during WordPress updates etc
nano /etc/crowdsec/parsers/s02-enrich/whitelists.yamlname: crowdsecurity/whitelists
description: "Whitelist events from private ipv4 addresses"
whitelist:
reason: "private ipv4/ipv6 ip/ranges"
ip:
- "::1"
- "YOUR_SERVER_IP_HERE" # Add your server's public IP
- "YOUR_HOME_IP_HERE" # Add your home/office IP if you have static
cidr:
- "127.0.0.0/8"
- "192.168.0.0/16"
- "10.0.0.0/8"
- "172.16.0.0/12"Monitoring and Maintenance
Regular Checks
Monitor your CrowdSec installation:
# Check CrowdSec status
systemctl status crowdsec

# View current decisions
cscli decisions list

# Check metrics
cscli metrics

# View alerts
cscli alerts listLog Analysis
Monitor what CrowdSec is detecting:
# Recent alerts
cscli alerts list -l 10

# Decisions by scenario
cscli decisions list --json | jq '.[] | .scenario' | sort | uniq -c

# Top blocked IPs
cscli decisions list --json | jq -r '.[] | .value' | sort | uniq -c | sort -nr | head -10Troubleshooting
Common Issues
- Connection refused from Traefik to CrowdSec:
- Ensure
listen_uriis set to0.0.0.0:8095 - Check firewall rules
- Verify the bouncer API key
- Ensure
- No decisions being made:
- Check if Traefik logs are being written
- Verify acquis.yaml configuration
- Ensure Traefik collection is installed
- False positives:
- Add legitimate IPs to whitelist
- Adjust scenario thresholds
- Review and tune profiles
- CAPTCHA not working:
- Verify hCaptcha keys are correct
- Check captcha.html file path
- Ensure domains are configured in hCaptcha
Conclusion
You now have a comprehensive security setup that includes:
- Real-time threat detection through CrowdSec’s behavioral analysis
- Community intelligence sharing and receiving threat data
- Flexible remediation with bans, CAPTCHA challenges, and rate limiting
- Instant notifications via Discord for security events
- System-level protection through firewall integration
- Application-level protection through Traefik middleware
- Intelligent whitelisting to prevent blocking legitimate traffic
- Comprehensive logging and monitoring for security insights
Thats it! Your Coolify installation is now protected by CrowdSec!


You forgot to mention that it’s necessary to change port in `/etc/crowdsec/local_api_credentials.yaml`
In the `nano /etc/crowdsec/profiles.yaml` code is an indention not correct. In the – Alert.Remediation row is one space to much.
Btw thank you for the helpful tutorial.